
Many new plant owners start with a few cheerful pots on a windowsill, feel proud when the leaves stay green for a while, and then slowly notice that growth has stalled, watering seems tricky, and roots occasionally peek from the drainage holes as if they are trying to escape.
When that happens, it is natural to worry that something mysterious is going wrong inside the pot, yet in a surprising number of cases the plant is simply ready for a new home, because container soil breaks down over time and roots eventually fill the available space, leaving very little room for fresh growth or balanced moisture.
Understanding how to repot houseplants gently and systematically gives you a clear way to respond to slow growth, yellowing leaves, or root bound signs, and this knowledge helps reduce stress not only for the plant but also for you, since each step becomes a calm, repeatable process instead of a guess or a gamble.
The goal of this guide is to walk through repotting steps in a visual, patient way, showing you how to prepare tools, recognise timing cues, select suitable pots and soil, move roots carefully, and support aftercare in the days and weeks that follow, so your plants can settle into their new containers with the least possible shock.
By the time you finish reading, you will have a tool list, a set of timing guidelines, detailed step-by-step instructions, and gentle aftercare routines based on common best practices from horticulture and houseplant care, all presented without assuming you have advanced experience or specialised equipment.
Understanding when houseplants need repotting: timing cues and root bound signs
Before lifting a plant from its pot, it helps to know whether repotting is really needed, because moving a plant too often can be as stressful as leaving it cramped for too long; careful observation offers plenty of clues if you know where to look.
Common signs a houseplant may be root bound or pot stressed
- Roots growing out of the drainage holes or circling the surface of the soil in dense mats.
- Water running straight through the pot very quickly, leaving the soil feeling dry again soon after watering.
- Soil pulling away from the sides of the pot, creating small gaps that let water bypass the root zone.
- Leaves yellowing or dropping from the bottom of the plant while new growth appears smaller or less frequent.
- Plant becoming top heavy or tipping easily because the upper growth outweighs the root support and soil mass.
Seasonal timing cues for repotting
Most houseplants respond best to repotting when they are in or nearing an active growth phase, since recovering roots and establishing new soil contact requires energy and strong physiological activity.
- Late winter to early spring is often ideal for many tropical houseplants kept indoors, because light levels are improving and growth is about to increase.
- Mid to late spring and early summer also work well for actively growing plants, especially if you notice clear root bound symptoms.
- Late autumn and winter, when days are short and plants are resting or growing slowly, are generally less ideal for large repots; small touch-ups or soil refreshes may still be possible if handled gently.
- Flowering plants may prefer to be repotted just before or after main flowering periods rather than in the middle of full bloom, to reduce stress on open buds and flowers.
Situations where repotting may not be the first solution
- If leaves are drooping but soil is still very wet, the issue might be overwatering or poor drainage rather than a need for larger pots.
- When pests such as insects or mites are present, treatment of the infestation may need to happen before or alongside repotting, depending on severity.
- If a plant has recently been moved or heavily pruned, waiting a short period before repotting can sometimes reduce combined stress.
Once you identify both root bound signs and favourable timing, you can prepare for the actual process with much greater confidence.
Tool list and preparation: setting up a calm workspace
Setting up a small, organised repotting station helps the entire process feel smoother and more visual, allowing you to focus on the plant instead of scrambling for missing tools mid-step.
Basic tools and supplies for repotting houseplants
- New pot or pots with drainage holes, one size larger than the current pot (for example, moving from 10 cm to 12 or 14 cm diameter).
- Fresh potting soil suitable for your plant type, such as a general indoor mix for many foliage plants or a chunkier mix for succulents and cacti.
- Optional amendments like perlite, bark or sand, if you wish to adjust drainage or aeration based on plant preferences.
- Small trowel or scoop for moving soil, although many people simply use their hands with gloves.
- Gloves, if you prefer to keep your hands clean or if the plant has irritating sap.
- Pruning shears or clean scissors for trimming roots or removing damaged leaves.
- Chopstick, blunt pencil or similar tool for gently working soil around new roots.
- Newspaper, plastic sheet or tray to protect the floor or table from spilled soil.
- Watering can or bottle with a narrow spout for controlled watering after repotting.
Preparing the new pot and soil
- Check that the new pot has at least one unblocked drainage hole at the bottom, since good drainage is crucial to prevent root rot in most houseplants.
- If the pot is brand new, give it a quick rinse to remove dust; if it is being reused, clean any old soil or mineral deposits and let it dry.
- Pre-moisten the potting soil slightly so it feels lightly damp but not soggy; soil that is too dry can be hard to pack around roots, while wet soil can be heavy and messy.
- Consider adding a small layer of coarse material or a handful of soil at the bottom of the new pot to create a base for the root ball to sit on, making sure not to block the drainage hole completely.
With tools ready and the new pot prepared, attention can shift to carefully moving the plant itself, always with the goal of supporting roots rather than shocking them.
Step-by-step repotting: how to repot houseplants with gentle handling
Core repotting steps are similar for many houseplants, yet the way you move, support and adjust the plant makes a large difference in how it experiences the change; moving slowly and observing as you go remains one of the most valuable tools for reducing stress.
Step 1: water timing before repotting
- Watering the plant a day before repotting often works well, because slightly moist soil holds together more easily, protecting roots when you slide the root ball from the pot.
- Very dry soil can cause roots and soil to crumble away too abruptly, while very wet soil becomes heavy and compacted, so aiming for moderate moisture provides the best balance.
- If the plant has been overwatered, it may be better to let the soil partially dry before repotting, especially if you suspect root rot and plan to remove damaged sections.
Step 2: gently removing the plant from its current pot
- Place one hand flat over the soil surface, supporting the stem or stems between your fingers, then invert the pot while keeping a steady grip on the plant base.
- Tap the bottom and sides of the pot gently with your hand or a soft tool to loosen the root ball; if roots have grown through the drainage hole, coax them back inside with care.
- Slide the plant slowly out of the pot, letting gravity and the loosened soil help, rather than pulling directly on stems or leaves.
- If the plant refuses to come out, run a flat tool, such as a plant tag or thin knife, around the inner pot edge to separate soil from pot walls before trying again.
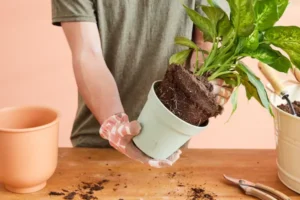
Step 3: inspecting and loosening the roots
Once the plant is free, the root ball will give you a visual story of what has been happening below the surface, and taking an extra minute to look closely can shape your next actions.
- Healthy roots usually appear firm and light in colour, while damaged or rotting roots may look dark, mushy or emit an unpleasant smell.
- Root bound plants often show dense, circling roots lining the pot shape, sometimes forming a tight net with very little soil visible between them.
- Gently tease apart circling roots with your fingers, starting from the outer layer; this encourages roots to grow outward into new soil instead of continuing in tight loops.
- Use clean scissors or shears to trim away obviously dead, mushy or broken root sections, working carefully to avoid removing more than necessary.
- If the root system seems extremely compact, consider making a few shallow vertical cuts along the root ball’s sides to help roots spread, but only when needed and always with a gentle hand.
Step 4: placing the plant in the new pot
- Hold the plant over the new pot and adjust the base layer of soil so that, once placed, the top of the root ball will sit slightly below the rim of the pot, leaving room for watering without overflow.
- Place the plant in the centre of the pot, checking that it sits at the same depth as before or slightly higher, rather than sinking too deep into the soil, which can encourage stem rot in some species.
- Support the plant with one hand while adding soil around the sides with the other, pressing gently to fill air gaps but avoiding compressing the soil into a hard mass.
- Use a chopstick or thin tool to wiggle soil gently around roots and into pockets, especially for plants with fine root systems, which ensures roots contact new soil without leaving large voids.
- Continue adding soil until the pot is filled to the desired level, then lightly tap the pot on the surface to help soil settle naturally.
Step 5: initial watering after repotting
- Once soil is in place, water slowly and evenly around the base of the plant, allowing water to sink into the new soil and reach the roots; stop once you see water draining from the bottom.
- Observe how the soil level changes after watering; top up with a small amount of additional soil if it sinks significantly, but avoid burying stems beneath the original soil line.
- Empty excess water from saucers or cachepots after a short period, as roots sitting in stagnant water for extended times can struggle to access oxygen.
- In some cases, especially with very stress-prone plants, minimal watering on the repotting day followed by more thorough watering a day or two later may feel gentler; always adjust for your particular plant and conditions.
After these repotting steps, the plant has officially moved into its new home, and thoughtful aftercare can support recovery and new growth in the following weeks.
Soil choices and pot size: matching repotting steps to plant needs
While the general process covers most houseplants, soil texture and pot size significantly affect moisture balance and root health, so taking a moment to match these factors to your plant reduces future watering stress.
Guidelines for choosing a new pot size
- Move only one size up in diameter, typically 2–5 centimetres larger than the previous pot, for most plants; oversized pots hold more soil than the roots can manage, increasing the risk of staying wet for too long.
- Select deeper pots for upright plants with strong central stems and larger root systems, while trailing plants or shallow-rooted species may do better in wider, shallower containers.
- Ensure the pot shape allows for stability; top-heavy plants may benefit from heavier materials or slightly wider bases to reduce tipping.
- Always choose pots with drainage holes unless you have significant experience with pots without drainage; even then, using an inner pot with drainage inside a decorative outer pot remains a safer choice.
Basic soil mix guidelines by plant type
- Tropical foliage plants (pothos, philodendrons, many ferns):
- Prefer a loose, well-draining mix that still holds some moisture.
- A common base is general indoor potting soil with added perlite or bark to create air pockets.
- Succulents and cacti:
- Need a very fast-draining, gritty mix that dries quickly between waterings.
- Use specialised succulent soil or combine potting mix with coarse sand, perlite or pumice in higher proportions.
- Thirsty flowering plants (such as some peace lilies):
- Benefit from slightly more moisture-retentive soil that still drains rather than waterlogging.
- Adding some organic matter to a standard mix while maintaining drainage works well for many.
- Large floor plants:
- Need heavier mixes that anchor roots and prevent plants from tipping, often with a balance of structure and drainage.
- Layered mixes that are looser on top and firmer below can sometimes work in large containers.
Choosing soil and pot sizes thoughtfully sets your plant up for a more forgiving watering pattern and better growth after repotting.
Aftercare: how to repot houseplants and support recovery in the following weeks
The day of repotting may feel like the main event, yet the weeks afterward are just as important, because roots are adjusting to their new environment and above-ground growth may pause briefly while the plant settles in.
Immediate aftercare in the first few days
- Place the newly repotted plant in a location with similar light to what it had before, avoiding sudden moves into much stronger or weaker light right away.
- Shield the plant from direct, intense midday sun for a short period after repotting, particularly if leaves appear slightly droopy from the change.
- Avoid fertilising immediately; many best-practice guides suggest waiting a few weeks before feeding, because fresh soil often contains nutrients and stressed roots may not benefit from additional fertiliser during recovery.
- Keep an eye on soil moisture, allowing the top layer to dry to the appropriate depth before watering again, remembering that new soil may retain water differently from the old mix.
- Gently wipe spilled soil from leaves and pot edges so that the plant and its container look tidy, which also helps you spot any early issues more easily.
Monitoring over the first month
- Check for signs of new growth, such as emerging leaves or stronger colour, which often indicate that roots are settling into the new soil successfully.
- Observe leaves for prolonged drooping, yellowing, or spotting; mild stress right after repotting can be normal, but continued decline may suggest watering or light issues.
- Adjust watering frequency carefully based on how quickly the new soil dries, noting that a larger pot will often stay moist longer than the previous one did.
- Consider a gentle, diluted fertiliser feeding only after the plant shows signs of resumed growth and at least a few weeks have passed since repotting, following product directions while erring on the side of weaker solutions.
- Rotate the pot gradually if you notice the plant leaning toward one direction, promoting even growth and light distribution.
Patience during this aftercare phase allows the plant to rebuild root strength and prepare for the kind of stronger growth that initially motivated you to repot.
Troubleshooting: common repotting issues and calm responses
Even with careful preparation and gentle hands, repotting occasionally leads to temporary setbacks, and understanding how to respond with a calm, observational approach prevents minor problems from becoming major ones.
Drooping leaves after repotting
- Mild drooping within the first day or two can be a normal response to root disturbance and changing soil conditions.
- Ensure the plant is not sitting in direct hot sun immediately after the move, as this can compound stress.
- Check soil moisture with a finger test; avoid pouring extra water on already moist soil in an attempt to fix droop, as this may worsen the situation.
- Give the plant a few days while maintaining gentle, stable conditions; many recover without any additional intervention.
Yellowing leaves after repotting
- Identify whether yellowing is appearing on older lower leaves or new growth:
- Lower leaves sometimes yellow naturally as plants adjust; removing a few spent leaves can tidy the appearance.
- New leaves yellowing or multiple fresh leaves declining may indicate overwatering, underwatering or root damage.
- Review watering since repotting and adjust by allowing the soil to dry more or less between waterings based on plant type.
- Consider whether the plant received a sudden shift in light intensity, and if so, move it gradually back to a more suitable level.
Persistent wilting or rot signs
- Extended wilting combined with soil that stays very wet may point to root problems, particularly if the old pot had drainage issues.
- In such cases, a careful inspection of the root system might be necessary to remove remaining rot, followed by repotting into fresher, better-draining soil.
- If you are unsure, reducing watering and improving air circulation around the plant often helps while you decide on further action.
Treating repotting outcomes as information rather than failure keeps your learning curve steady and your plants supported, even when occasional setbacks occur.
Printable checklist: how to repot houseplants step by step
Having a concise checklist near your repotting tools can make the process feel less intimidating, and it also helps ensure that important details are not forgotten when you are focused on handling roots and soil.
| Stage | Key Actions | Done? |
|---|---|---|
| 1. Decide if Repotting is Needed |
|
|
| 2. Prepare Tools & Space |
|
|
| 3. Remove Plant |
|
|
| 4. Inspect & Loosen Roots |
|
|
| 5. Pot Up |
|
|
| 6. Aftercare |
|
Using this checklist as a companion to the more detailed explanations helps keep repotting sessions clear and calm, especially when you are still building confidence as a plant caretaker.
Best-practice background and gentle reminders
The repotting steps, timing cues, soil recommendations and aftercare advice in this guide draw on common practices used by experienced houseplant growers, nursery workers and horticulture educators, all of whom emphasise the importance of appropriate pot sizing, well-draining soil, gentle handling and patience during recovery.
Different species may have unique preferences, such as tighter pots for some flowering plants or extra chunky soil for certain tropicals, which means that checking general care information for each plant type and adjusting these broad guidelines slightly will often produce the best results.
Whenever uncertainty appears, leaning on observation can be helpful: roots and leaves will respond over time to the new conditions, and those responses, combined with your growing understanding of how to repot houseplants, will guide you to adjust water, light or soil more accurately with each experience.
Repotting does not need to be rushed or dramatic, and as you develop slower, more attentive repotting habits, the process tends to become a quiet, satisfying ritual that marks a new chapter in the life of each plant rather than a stressful emergency procedure.