Learning how to fix a squeaky door safely is much simpler than it seems at first glance, because most squeaks come from dry or slightly dirty door hinge parts that can be cleaned and lubricated with a few household items and a calm, step-by-step approach rather than a full hardware replacement or complex home fix project.
This guide keeps everything safety-first and beginner friendly, walking through a clear tool list, a quick 10-minute fix you can try right away, a slightly deeper clean-and-lubricate method for stubborn squeaks, and practical cautions so you avoid pinched fingers, scratched floors or chemical splashes while you work on the door hinge assembly.
By following the steps carefully and paying attention to simple checks like how the door sits in the frame and whether the hinge screws are snug, you can generally silence an annoying squeak in one short session and gain confidence to tackle other small home fix jobs around your home.
Safety-first basics before working on a squeaky door
Even relatively simple tasks deserve a safety check, and treating home projects with respect from the beginning helps you avoid the kinds of minor injuries or accidental damage that make people swear off DIY after one bad experience.
Common risks when fixing a squeaky door
- Fingers can be pinched between the door and the frame if someone moves the door while your hand is on the hinges or in the gap near the latch.
- Metal edges on a hinge, hinge pin or screwdriver can scrape knuckles when you are working in tight spaces or applying pressure unexpectedly.
- Oil-based lubricants and sprays may drip onto floors, making them slippery, or stain carpets and clothing if surfaces are not protected first.
- The door itself can shift slightly if hinge pins are removed and not supported, which can surprise you and potentially strain your back or damage the frame.
- Chemical products, even household lubricants, can irritate skin or eyes if used carelessly, particularly in poorly ventilated hallways or small rooms.
Simple safety habits to use every time
- Ask another adult to help if the door is heavy or if you feel unsure about holding the door steady while working on the hinge, because one extra pair of hands can make everything feel more controlled.
- Place a cloth, old towel or piece of cardboard on the floor under the hinges before applying any lubricant, which will catch drips and protect both flooring and your shoes.
- Wear basic eye protection and disposable or washable gloves when using aerosol lubricants, since fine mist can bounce off the metal and you do not want it near your eyes or skin.
- Keep small parts such as hinge pins, screws or washers in a small tray or container on a nearby table, so nothing rolls away and gets lost or stepped on.
- Work slowly, reading each step fully before you act, and if anything feels unstable or unclear, pause and reassess instead of forcing the hardware to move.
Tool and materials list for how to fix a squeaky door safely
Having everything ready before you begin makes the whole process smoother, and most new DIYers will already own at least some of these items or can acquire them inexpensively.
Basic tools most beginners can handle
- Standard flat-head screwdriver and Phillips (cross-head) screwdriver, which you will use to tighten or remove hinge screws and gently lift a hinge pin if needed.
- Small hammer or rubber mallet, mainly for tapping hinge pins up or down with light, controlled strikes rather than heavy blows.
- Clean rags or old T-shirts you do not mind getting dirty, helpful for wiping off old grime, excess lubricant and drips on the door hinge or door surface.
- Protective gloves, ideally with some grip, to prevent slipping and to keep your hands cleaner while working with lubricants and metal hardware.
- Optional pliers, useful for gripping the top of a hinge pin if it is stubborn and does not slide out with gentle tapping alone.
Lubricant and cleaning materials for the door hinge
- Silicone-based spray lubricant or dry-film lubricant, which is widely recommended for door hinges because it is less likely to attract dust and remains effective over time.
- White lithium grease or a PTFE (Teflon-style) household lubricant in small quantities, both of which can provide long-lasting lubrication when applied sparingly to hinge pins and moving hinge joints.
- Mild household cleaner or a small amount of soapy water and a separate rag, used to remove built-up dirt on the hinge surfaces before you lubricate.
- A small disposable brush or cotton swabs for reaching into tight gaps on the hinge if the hardware is especially dirty or old.
- Paper towels or additional rags dedicated to cleanup, so your main cleaning cloth does not become overly oily and smear lubricant where you do not want it.
Floor and surface protection items
- Cardboard or a folded drop cloth placed under the door hinge area, protecting carpets and hard floors from drips and providing a clear work zone.
- Masking tape or painter’s tape to shield painted areas if you are concerned about overspray from aerosol lubricants touching walls or trim.
- Small step stool if the upper hinge is high and out of comfortable reach, although make sure it is stable and used according to its instructions.
Quick 10-minute fix: how to silence a squeaky door fast
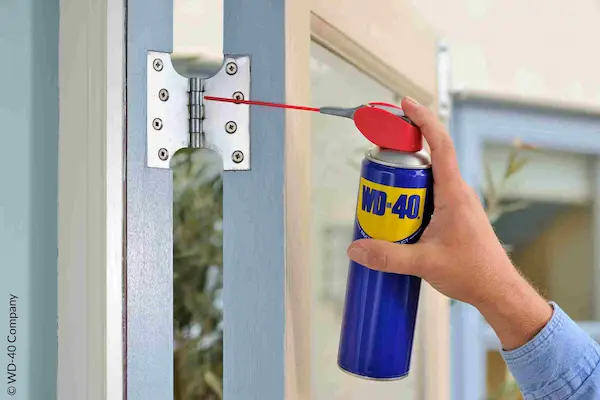
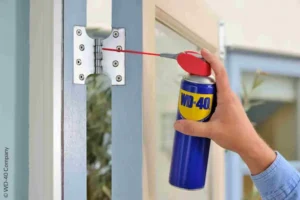
When you want the squeak gone quickly and the door is otherwise in good condition, the fastest method is to apply lubricant directly to the hinge joints without fully disassembling the hardware, following a careful sequence that keeps the job controlled and safe.
Step 1: listen closely and locate the loudest door hinge
- Open and close the door slowly several times while listening carefully, and try to notice whether the squeak appears when the door begins to move, reaches the middle of its swing, or nears the frame.
- Watch each hinge as the door moves and see if any hinge shifts sharply, binds slightly or appears misaligned, because the noisiest hinge is often the one that needs your attention first.
- Place one hand lightly near each hinge (without putting fingers in the gap) to feel which area vibrates or scrapes as the sound occurs, which helps confirm where to focus your lubricant.
Step 2: prepare the work area and protect nearby surfaces
- Lay your cardboard, towel or drop cloth directly under the hinge area so that any lubricant that drips will land on the protective material instead of your floor.
- Shake the lubricant can or ready the lubricant container according to its instructions, and test the spray or nozzle briefly into a rag away from the door to understand how strong the stream is.
- Ask another person to hold the door steady if the hinges feel loose or if children or pets are moving through the area, reducing distractions and unplanned movement while you work.
Step 3: apply lubricant directly to hinge joints without removing pins
- Start with the top hinge, since gravity will sometimes help draw lubricant downward, and aim the spray straw or nozzle at the small gap between the hinge knuckles where the pin sits.
- Apply a short burst or a small drop of lubricant at several points along the hinge, avoiding heavy saturation, because a light coating usually does the job without creating messy drips.
- Move to the middle hinge and then the bottom hinge in turn, repeating the same light application technique so each area receives some lubricant.
- Open and close the door fully around ten times, moving slowly at first and then at a more natural speed, allowing the lubricant to work its way into the moving parts of each door hinge.
Step 4: wipe excess, test again and decide whether you are done
- Use a clean rag or paper towel to wipe away any lubricant that has dripped down the hinge plate, the door edge or the floor protection, taking care not to smear it onto walls or painted trim.
- Listen again as you swing the door open and closed, paying attention to whether the squeak has vanished, become softer or simply moved slightly to another hinge.
- Repeat light lubrication on any hinge that still produces noise, once more cycling the door several times, but avoid flooding the hardware since too much product can attract dust over time.
- Once the sound is gone or reduced to a very low level, clean up your tools, remove floor protection and wash your hands, considering this 10-minute fix complete unless the squeak returns quickly or the door appears misaligned.
Deeper home fix: cleaning and lubricating hinges by removing hinge pins
Some doors continue to squeak even after a quick lubrication, especially if there is old, sticky residue inside the hinge or corrosion on the hinge pin, in which case a deeper clean is still manageable for a new DIYer as long as you work methodically and support the door properly.
Preparing to remove hinge pins safely
- Work on one hinge at a time so the door remains supported by the other hinges and does not suddenly drop or twist out of alignment.
- Place a block of wood or a sturdy doorstop under the door edge if you are concerned about movement, particularly with heavy solid-core doors.
- Ensure that pets and children stay out of the room until you have finished, preventing accidental bumps to the door while hardware is partly disassembled.
Step-by-step hinge pin removal and cleaning
- Position the flat-head screwdriver tip under the round head of the hinge pin (for standard interior hinges) or against the bottom end if the design is inverted, and tap gently upward with the hammer until the pin rises slightly.
- Grip the exposed pin head with pliers or gloved fingers, and pull it out slowly while supporting the door with your other hand or having a helper hold the door steady.
- Inspect the removed hinge pin and the hinge barrel; look for rust, old paint, hardened oil or visible debris, all of which can contribute to friction and squeaking.
- Wipe the pin thoroughly with a rag and mild cleaner, or use fine steel wool very gently if there is rust, then dry the metal completely so moisture does not remain trapped in the hinge.
- Apply a thin film of your chosen lubricant along the pin and lightly inside the hinge barrel, avoiding heavy gobbed-on coats that might drip when you reinstall the hardware.
- Slide the pin back into the hinge while the door remains in its normal position, tapping gently with the hammer until the head seats flush with the hinge top.
- Repeat the process for each hinge, one at a time, testing the door’s movement after each pin is cleaned and reinstalled so you can check whether the squeak disappears gradually.
Choosing the right lubricant for a door hinge
Not all lubricants behave the same way, and selecting an appropriate product makes it more likely that your home fix will last for months rather than only a few days, while also reducing mess and avoiding chemical stains on nearby surfaces.
Lubricants that generally work well on hinges
- Silicone spray lubricant: often recommended for door hinge use because it dries to a thinner film that does not remain sticky and tends to attract less dust than heavier oils.
- Dry-film PTFE lubricants: leave a slippery, dry-feeling coating once the carrier liquid evaporates, which can be especially useful in dusty environments or around doors that see frequent use.
- White lithium grease: offers heavier, long-lasting lubrication for metal-to-metal contact and may be suitable for exterior or heavier doors when applied sparingly to cleaned hinge pins and joints.
- Specialist hinge lubricants: sold specifically for door hardware and usually designed to be safe on common finishes; these can be a good option if you want to follow manufacturer advice closely.
Products to use cautiously or avoid on door hinges
- Cooking oils such as olive or vegetable oil might seem handy, yet they often become sticky over time and can go rancid, making the squeak worse and attracting dirt and unpleasant smells.
- Thick automotive grease may be overkill for an interior door hinge and can be very messy, so unless a product is specifically recommended for household hinges, a lighter option is usually safer for beginners.
- Multi-purpose penetrating oils can help loosen stuck hardware, but as a long-term hinge lubricant they may evaporate too quickly or leave the hinge feeling dry again after a short time.
- Any lubricant that is highly staining or not intended for indoor use should be avoided around painted doors, carpets and visible trim, since cleanup can be difficult if spills occur.
Checking alignment and hardware when squeaks keep coming back
Occasionally, a squeaky door signals not only dry hardware but also slight misalignment in the frame or loose screws that shift when the door moves, and addressing these issues may be necessary if lubrication alone does not silence the noise.
How to inspect the door’s position and hinge screws
- Stand back and look at the gap between the door and the frame along the sides and top, noticing whether the spacing appears even or tighter near one hinge.
- Try lifting the open door gently by the handle; if you feel noticeable play or see the top of the door wobble, one or more hinge screws may be loose or stripped.
- Use your screwdrivers to snug each hinge screw by a small amount, ensuring they are tight but not overtightened to the point of damaging the wood.
- For screws that spin without tightening, consider slightly longer screws of the same diameter or using basic wood repair techniques such as inserting wooden toothpicks with wood glue into the hole before reinstalling the screw, taking care not to overdo repairs beyond your comfort level.
When door alignment may require professional help
- If the door rubs heavily on the floor, scrapes so loudly that lubrication makes little difference, or visibly sags out of the frame, the underlying structural alignment may need more advanced carpentry than a quick home fix.
- Fire-rated or self-closing doors, especially those in multi-unit buildings or near garages, may be part of a safety system and should not be altered significantly without understanding building regulations and code requirements.
- Exterior doors that no longer close properly or have visible gaps may affect security and energy efficiency, making a professional inspection a reasonable next step.
Quick reference: 10-minute squeaky door fix checklist
Having a short checklist you can glance at while standing by the door helps keep everything on track, particularly when you are new to DIY and do not want to forget safety steps in the middle of the process.
Ten-minute fix summary for busy beginners
- Listen and identify which hinge seems to squeak the most as the door moves.
- Lay down floor protection and gather your lubricant, rag and screwdriver nearby.
- Apply a small amount of lubricant to the top, middle and bottom hinges, focusing on the moving knuckles and hinge pin area.
- Open and close the door repeatedly to work the lubricant into the joints.
- Wipe off any excess lubricant to prevent drips or stains on the door and floor.
- Test for remaining squeaks; if needed, repeat a light application on stubborn hinges.
- Once quiet, tidy the area, safely store tools and check that all hinges and screws look secure.
Frequently asked questions about how to fix a squeaky door
Is it necessary to remove the door from the frame to stop a squeak
Most squeaks can be resolved without taking the door off the frame entirely, and beginners are usually better off leaving the door in place while lubricating hinges or removing hinge pins one at a time so the structure remains stable.
How often should I lubricate a door hinge as part of regular home care
Interior doors in average conditions may need attention only every year or two, with very high-use or exterior doors sometimes benefiting from a quick lubrication once or twice a year, especially before seasons with higher humidity that can influence wood and metal movement.
Can I use the same lubricant on cabinet doors and other small hinges
Many silicone or dry-film household lubricants are suitable for cabinet hinges and smaller hardware, although you should always read the product label for recommendations and test a tiny amount in an inconspicuous spot in case finishes react differently.
What should I do if the hinge is rusted or heavily corroded
Light surface rust can sometimes be cleaned with gentle abrasion and then protected with lubricant, yet deep corrosion or flaking metal may indicate the hinge is weakened and should be replaced rather than only lubricated, especially on heavy doors where hardware integrity matters for safety.
When is it better to call a professional instead of continuing DIY attempts
Situations involving misaligned or damaged frames, fire-rated or self-closing doors, doors that are part of a security system or any repair that requires cutting into walls or altering lock hardware are often best handled by qualified professionals who can ensure both safety and compliance with building standards.
Closing notes: calm, careful steps turn small squeaks into simple wins
Handling your first small repair project is less about strength or specialized training and more about patience, basic safety awareness and a willingness to follow each step in order, which is exactly what you do when you learn how to fix a squeaky door using the methods outlined in this guide.
With a handful of simple tools, a suitable door hinge lubricant and a ten-minute fix sequence, you can remove one of the most common daily irritations in a typical home while also gaining valuable experience that will make future home fix tasks feel more approachable.
Remember that taking a little extra time to protect floors, wear gloves and check alignment means your repair is more likely to last and less likely to cause side effects such as stains, loose hardware or unstable doors.
Each quiet door you leave behind is more than just a silenced squeak; it is a small sign that you can safely manage basic maintenance, respect your limits when larger structural issues appear and build practical confidence step by step throughout your home.